


How Long Does It Take to Replace an Alternator? Full Guide
An alternator is an essential part of your car’s electrical system, responsible for charging the battery and powering electrical components when the engine is running. Over time, your alternator can fail, leading to several problems like dimming headlights, electrical failures, or difficulty starting your car. If you’ve found yourself dealing with any of these issues, it’s crucial to understand the process of replacing an alternator, how long it takes, and what to expect during the replacement.
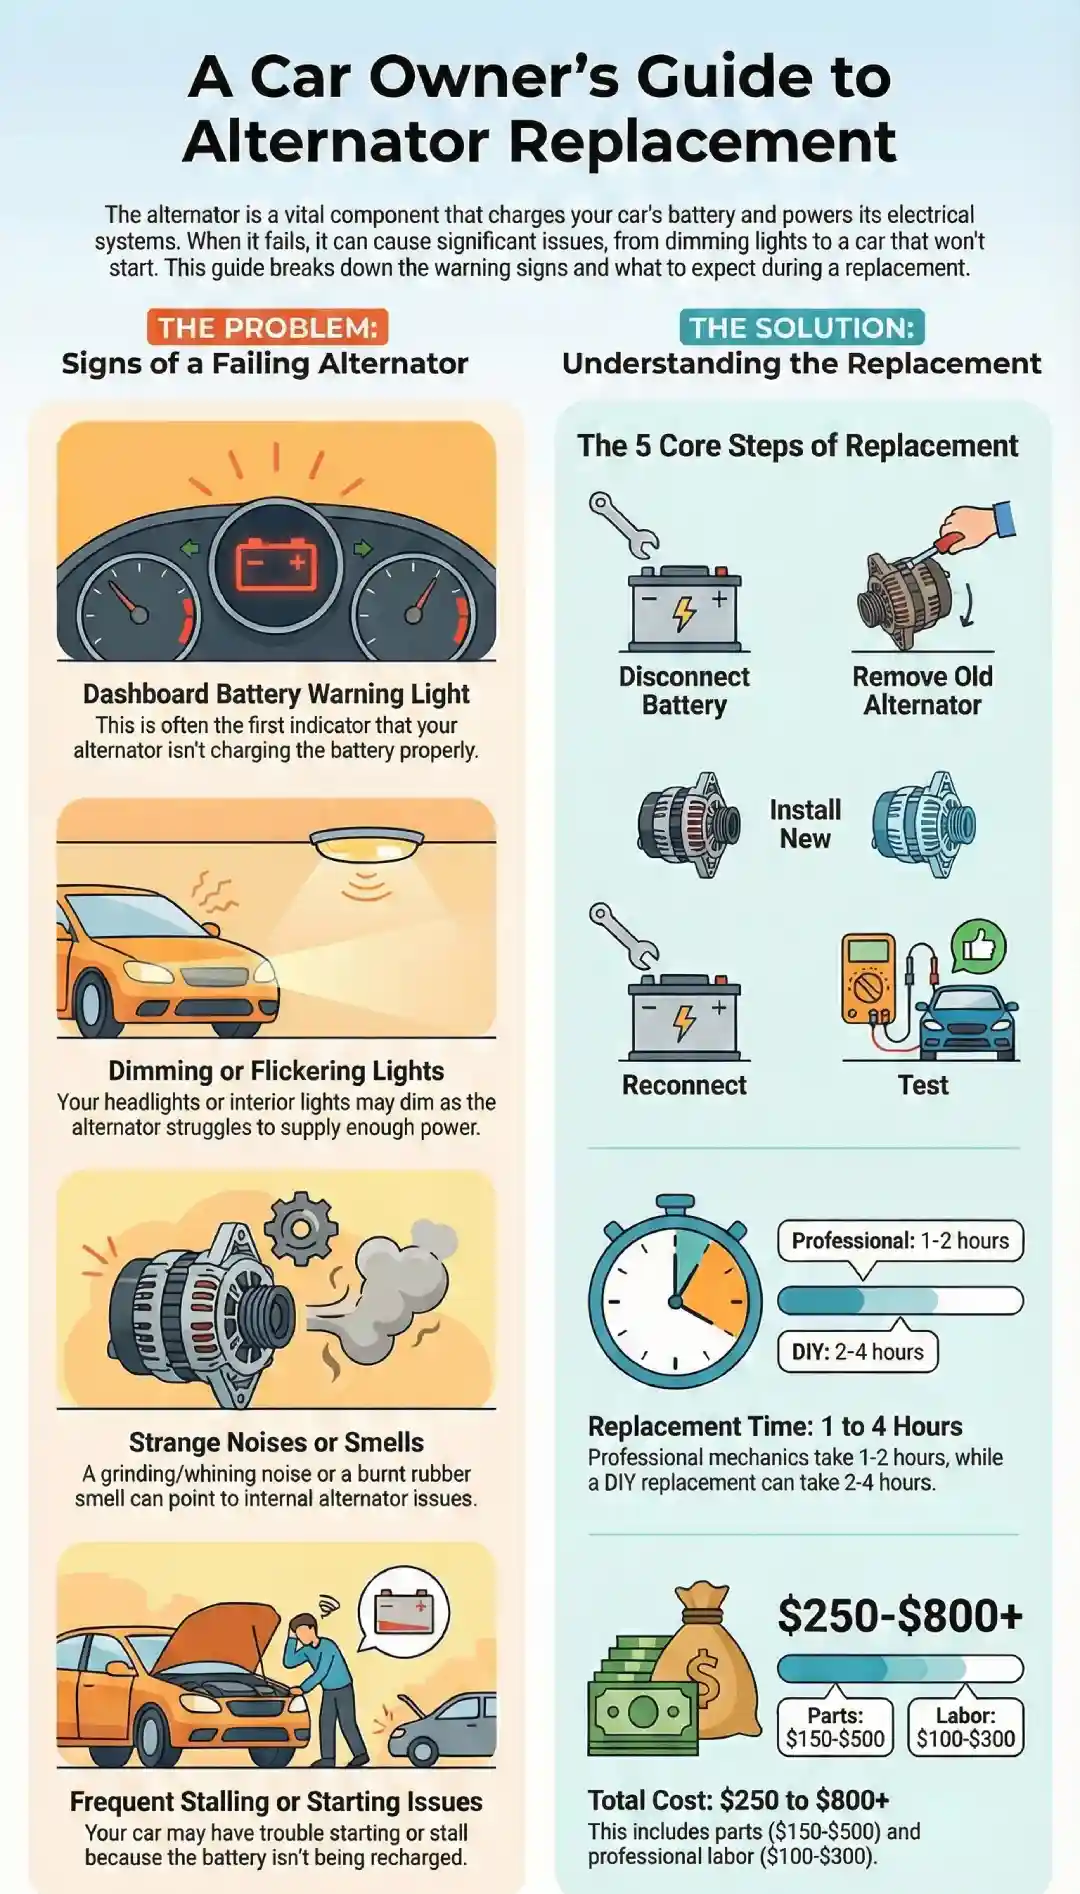
If you’re dealing with issues like dimming headlights, electrical failures, or difficulty starting your car, it’s important to know how long it typically takes to replace an alternator. The replacement process usually takes around 1 to 2 hours if performed by a professional mechanic. However, if you’re doing it yourself, the time can range from 2 to 4 hours, depending on your experience and the complexity of your car model. At Torrance Motors, we can handle the alternator replacement quickly and efficiently, ensuring that your car is back on the road in no time.
What Is an Alternator and How Does It Work?
An alternator is a key component in your car’s electrical system. It’s responsible for converting mechanical energy from the engine into electrical energy, which is used to charge the battery and power electrical systems like lights, the radio, and the air conditioning. The alternator ensures that your car’s battery remains charged while the engine is running, which prevents it from draining and causing your car to stall.
Why Is the Alternator Important for Your Car’s Performance?
The alternator is vital because it keeps the battery charged and supports the vehicle’s electrical needs. Without a properly functioning alternator, your car’s battery will not receive a charge, causing the vehicle to lose power. This can lead to several problems such as:
- Dimming or Flickering Lights: If the alternator isn’t supplying enough power, your lights may start to dim or flicker.
- Battery Drain: A weak or failing alternator will drain your car’s battery quickly, and eventually, your car won’t start.
- Engine Stalling: Without the alternator’s power, your engine may stall, especially when stopping at a traffic light or idle.
Common Signs Your Alternator Needs Replacement
Recognizing the signs of a failing alternator can help you avoid getting stranded with a car that won’t start. Here are the most common indicators that it’s time for a replacement:
- Battery Warning Light: One of the first signs of an alternator issue is the appearance of the battery warning light on your dashboard. This could indicate that the alternator isn’t charging the battery properly.
- Dimming or Flickering Lights: If your headlights or interior lights start dimming or flickering while driving, it’s a sign that the alternator isn’t supplying enough power.
- Strange Noises: A failing alternator might make a grinding or whining noise. This noise can often be traced back to worn-out bearings inside the alternator.
- Electrical Failures: If you start experiencing issues with your car’s electrical components, like power windows, dashboard lights, or the radio turning on and off, it might be due to a failing alternator.
- Frequent Stalling or Starting Issues: If your car has trouble starting or keeps stalling, it’s often because the alternator isn’t providing enough power to the battery.
- Burning Smell: A burnt rubber or electrical smell could indicate that the alternator’s belt is overheating, signaling potential issues with the alternator.
How Long Does It Take to Replace an Alternator?
Average Time for Alternator Replacement
The time it takes to replace an alternator can vary depending on whether you’re doing it yourself or having a professional handle the job. Here are the general estimates:
- For DIYers: Replacing an alternator can take anywhere from 2 to 4 hours if you’re experienced and have all the necessary tools. If you’re a beginner, it may take longer as you’ll need time to figure out the steps and troubleshoot any complications.
- For Professional Mechanics: A professional mechanic can typically replace an alternator in about 1 to 2 hours. Experienced technicians can complete the job quickly and efficiently, ensuring your car is back on the road with minimal downtime.
Breakdown of Time by Steps
When replacing an alternator, several factors can influence how long the process takes:
- Vehicle Model: The complexity of accessing the alternator can vary by car make and model. For example, a compact car may require less time to access the alternator compared to a larger SUV.
- Tools and Experience: Having the right tools and a solid understanding of the alternator replacement process can reduce time significantly. Professionals have specialized tools that make the job quicker.
- Location of the Alternator: In some vehicles, the alternator is more accessible, while in others, it may be hidden behind other parts, requiring extra steps to remove.
Here’s a general breakdown of the steps involved:
- Disconnect the Battery: This safety step usually takes about 5 to 10 minutes.
- Access the Alternator: Depending on the vehicle, this may take 15 to 30 minutes.
- Remove the Old Alternator: This process can take about 30 to 45 minutes, especially if there are other parts blocking the alternator.
- Install the New Alternator: Fitting the new alternator generally takes 30 to 45 minutes.
- Reconnect Electrical Components and Test: The final checks and reconnection usually take about 15 to 30 minutes.
Average Cost of Alternator Replacement
The cost of replacing an alternator depends on several factors, including the car make, model, and whether you’re doing the job yourself or hiring a mechanic. Here’s an overview of the typical costs:
- Parts: The cost of an alternator ranges between $150 to $500 for the part itself. The price can vary depending on the brand and the vehicle model. For example, luxury brands or newer models may have more expensive alternators.
- Labor: Professional labor costs typically range between $100 to $150 per hour. Since the replacement usually takes 1 to 2 hours, the total labor cost can range from $100 to $300.
- Total Cost: For a full alternator replacement, you can expect to pay between $250 and $800 or more, depending on the car’s make and the shop you choose.
DIY vs. Professional Replacement Costs
- DIY Cost: If you decide to replace the alternator yourself, you’ll only pay for the cost of the part, which ranges from $150 to $500. However, you’ll need to account for the time spent and the tools required. Additionally, any mistakes made during the process could end up costing you more in repairs.
- Professional Cost: Opting for professional help can cost more due to labor charges, but you’ll have the peace of mind that the job is done right the first time. Professionals will complete the replacement quickly and correctly, preventing any future issues.
Step-by-Step Process to Replace an Alternator
Replacing an alternator involves several steps, but the process can be broken down into manageable tasks. Here’s a detailed, easy-to-follow guide for those who want to try it themselves:
Step 1: Prepare the Vehicle
Before beginning, make sure the vehicle is parked on a flat surface and the ignition is turned off. Always disconnect the negative terminal of the battery first to avoid electrical shocks or shorts during the process. This step typically takes about 5 to 10 minutes.
Step 2: Accessing the Alternator
Depending on the car model, you may need to remove parts like the air intake system or hoses to access the alternator. This step can take anywhere from 15 to 30 minutes, depending on how easy it is to get to the alternator.
Step 3: Removing the Old Alternator
Once you have clear access to the alternator, the next step is to remove the old one. This usually involves:
- Disconnecting Electrical Connections: You’ll need to unplug the electrical connectors from the alternator. Take note of where each connector goes, as this will help during the reinstallation process. Depending on the vehicle, this can take about 10 to 15 minutes.
- Removing the Serpentine Belt: The serpentine belt powers the alternator, so you’ll need to release the tension on the belt. Use a ratchet or wrench to move the tensioner and remove the belt from the alternator. This step usually takes about 10 to 15 minutes.
- Unbolting the Alternator: There are typically 2 to 3 bolts securing the alternator in place. You’ll need to remove these bolts before pulling the alternator out. Be careful not to damage any surrounding components. This step usually takes about 15 to 20 minutes.
Step 4: Installing the New Alternator
With the old alternator removed, it’s time to install the new one:
- Place the New Alternator: Carefully position the new alternator into place. Make sure it fits properly into the mounting brackets. This step is usually quick, taking around 10 minutes.
- Reconnect Electrical Components: Attach the electrical connectors back to the alternator. Ensure all wires are securely connected to avoid electrical malfunctions. This can take about 10 to 15 minutes.
- Reinstall the Serpentine Belt: Place the serpentine belt back onto the new alternator. You will need to release the tensioner again and make sure the belt is positioned correctly. This step usually takes about 10 minutes.
Step 5: Reconnect the Battery
Once the alternator is fully installed, reconnect the battery by attaching the negative terminal first. Tighten the connections securely. This should take around 5 minutes.
Step 6: Testing the Alternator
After you’ve completed the installation, it’s essential to test the new alternator to ensure everything is working properly:
- Start the Engine: Turn on your vehicle and check the dashboard for any warning lights. If the battery light goes off and stays off, the alternator is working correctly. This takes around 5 minutes.
- Test the Voltage: Use a multimeter to measure the voltage across the battery terminals. A healthy alternator should provide between 13.5 and 14.5 volts. If the reading falls outside this range, there may be an issue. This testing process usually takes about 5 to 10 minutes.
- Listen for Strange Noises: While the engine is running, listen for any unusual noises like grinding or squealing, which could indicate improper installation or issues with the new alternator. This step generally takes 5 minutes.
What Happens After Replacing the Alternator?
Initial Start-Up Check
Once the alternator is replaced and your car is running, it’s crucial to perform a quick start-up check. Start by ensuring that the engine starts smoothly and that no abnormal sounds are coming from the engine bay. Also, pay attention to how the dashboard lights behave.
Check the Dashboard Warning Lights
Make sure the battery warning light on your dashboard goes off. If it stays illuminated, it could mean there’s still an issue with the alternator or its connection. Similarly, keep an eye on other electrical system lights, such as the check engine light. If any other warning lights remain on, further inspection may be necessary.
Why Does It Take Time to Test the Alternator?
Testing the alternator takes time to ensure that the new part is working correctly. A good alternator should charge the battery consistently, and you want to ensure that it’s providing the correct amount of voltage to the electrical system. This testing ensures that your vehicle’s electrical systems run smoothly and prevents further damage.
Signs That the Alternator Is Working Properly
Once the alternator is installed and tested, here are some signs that it is functioning properly:
- The Battery Light Goes Off: This is the primary indicator that the alternator is working correctly.
- Proper Voltage Reading: The voltage reading should be between 13.5 and 14.5 volts.
- No Strange Sounds: The alternator should run quietly without any unusual noises.
- No Flickering Lights: Headlights and dashboard lights should remain stable without flickering or dimming.
How Long Should You Let Your Car Run After Replacing the Alternator?
Why Letting the Car Run Is Important
After replacing the alternator, it’s important to let the car run for a few minutes to ensure everything is functioning as it should. This gives the alternator time to charge the battery and allows you to monitor the car’s performance.
How to Test the Alternator’s Performance
Once the car is running, perform a few checks to test the alternator’s performance:
- Observe Dashboard Lights: Ensure that the battery light stays off and no other warning lights come on.
- Monitor Electrical Components: Check the functionality of electrical systems like the lights, air conditioning, and radio. If everything is working well, the alternator is likely performing properly.
Signs That the Alternator Is Working Properly
After running the car for a while, confirm that the alternator is working correctly:
- No Battery Warning Light: The absence of the battery warning light is a clear sign that the alternator is charging the battery properly.
- Voltage is Stable: The voltage reading should remain consistent between 13.5 and 14.5 volts.
- Electrical Systems Functioning Normally: Ensure that all electrical components in your car are working smoothly, including lights, air conditioning, and the radio.
How to Know If the Alternator Was Installed Correctly?
Key Indicators of a Successful Installation
Once the alternator is installed and tested, you can ensure that the job was done correctly by checking a few things:
- No Warning Lights: After the car is running, check to see if the battery warning light stays off.
- Smooth Engine Operation: The engine should run smoothly without stalling or hesitation.
- Functional Electrical Systems: All electrical systems, including lights and radio, should work properly without any flickering or failure.
Common Mistakes During Alternator Replacement
Even experienced DIYers can make mistakes during alternator replacement. Common errors include:
- Incorrect Wiring: Ensure all the electrical connectors are reattached to the right terminals.
- Improper Belt Tension: If the serpentine belt isn’t properly tensioned, the alternator may not function correctly.
- Loose Bolts: Double-check that all bolts securing the alternator are tightened properly.
With years of experience serving the Torrance area, we provide fast, reliable alternator replacement services at competitive prices. Whether you need a new alternator or simply want to have your current one inspected, Torrance Motors is here to make sure your vehicle runs at its best. Don’t wait until your alternator fails; schedule an appointment today!
Can You Drive Without a Working Alternator?
What Happens If the Alternator Fails?
Driving without a working alternator can cause your car’s battery to drain quickly. When the battery runs out of charge, the car will lose power, and the engine may shut down. This is especially dangerous on long drives, where you might be far from a repair shop.
How Long Can You Drive Without an Alternator?
While it’s not recommended to drive with a failed alternator, some people can drive for a short period (usually 30 minutes to an hour) before the battery runs out of charge completely. However, this is risky, and you should plan to get the alternator replaced as soon as possible.
Risks of Driving with a Faulty Alternator
Driving with a faulty alternator can damage other parts of your car, such as the electrical system and the battery. A failed alternator can also cause your vehicle to stall suddenly, leaving you stranded on the road.
Pro Tips for Alternator Replacement
Use Quality Parts
Using a high-quality alternator ensures that the replacement lasts longer and works more efficiently. Cheap, low-quality alternators can fail quickly and cause more issues.
Check the Voltage Regulator
When replacing the alternator, consider checking the voltage regulator as well. If the regulator is malfunctioning, it can prevent the alternator from charging the battery properly.
Follow Manufacturer Instructions
Always refer to the manufacturer’s instructions for your vehicle model to ensure you’re following the correct procedures and using the right parts.
DIY Tips for Efficiency
If you’re doing the alternator replacement yourself, make sure you have the right tools and take your time. Avoid rushing through the process, as this could lead to mistakes that might cause issues later.
Frequently Asked Questions
How Long Does It Take to Replace an Alternator in a Honda/Toyota/BMW?
- Honda: Typically 1.5 to 2 hours.
- Toyota: Usually takes 1.5 to 3 hours.
- BMW: Can take 2 to 3 hours due to complex designs.
Can You Replace an Alternator Yourself?
Yes, but it requires the right tools and knowledge. If you’re not confident, it’s better to have a professional do it to avoid mistakes.
How Do You Know if Your Alternator Is Completely Dead?
Signs of a dead alternator include the car stalling, battery warning light staying on, electrical failures, or strange noises from the engine.
What Is the Lifespan of an Alternator?
An alternator typically lasts between 80,000 to 150,000 miles, depending on driving conditions and vehicle model.
Can a Faulty Alternator Damage Your Car’s Electrical System?
Yes, a faulty alternator can cause the battery to drain, leading to electrical component failures and even engine stalling.
Final Verdict
Replacing an alternator is a crucial repair that should not be put off. Whether you choose to replace the alternator yourself or hire a professional, understanding the process and the time involved can make the experience much smoother. Remember, if you’re ever unsure about handling the repair on your own, the expert team at Torrance Motors is ready to help.
