


How to Fix a Car Alternator: A Complete Guide for Torrance Drivers
Finding yourself stuck with a car that won’t start while parked at the Del Amo Fashion Center or stalled in traffic on headache. Most people assume a dead battery is the culprit, but very often the problem is actually a failing alternator. Your alternator is the power plant of your vehicle; it keeps the battery charged and runs all your electrical systems while the engine is on.
If it stops working, your battery will drain until the car simply dies. At Torrance Motors, we believe in helping our neighbors understand their vehicles so they can avoid getting stranded. This guide explains how to accurately diagnose the problem and walk through the steps of fixing or replacing the alternator to keep your car reliable.
Diagnosis and Understanding the Problem
Don’t Let a Dead Battery Fool You
Before you run out and spend hundreds of dollars on a new battery, you need to be sure the alternator isn’t the real issue. Many drivers in Torrance mistake a charging failure for a battery failure because the symptoms look the same: dim headlights, a slow crank, or a car that needs a jump-start every morning. However, if your battery is relatively new but keeps dying, your alternator likely isn’t providing enough voltage to refill the battery as you drive. It is a mechanical part that spins thousands of times per minute, so the internal components eventually wear out. Knowing the difference between these two parts can save you a lot of money and prevent you from replacing parts that are still perfectly good.
The 3-Step Multimeter Test
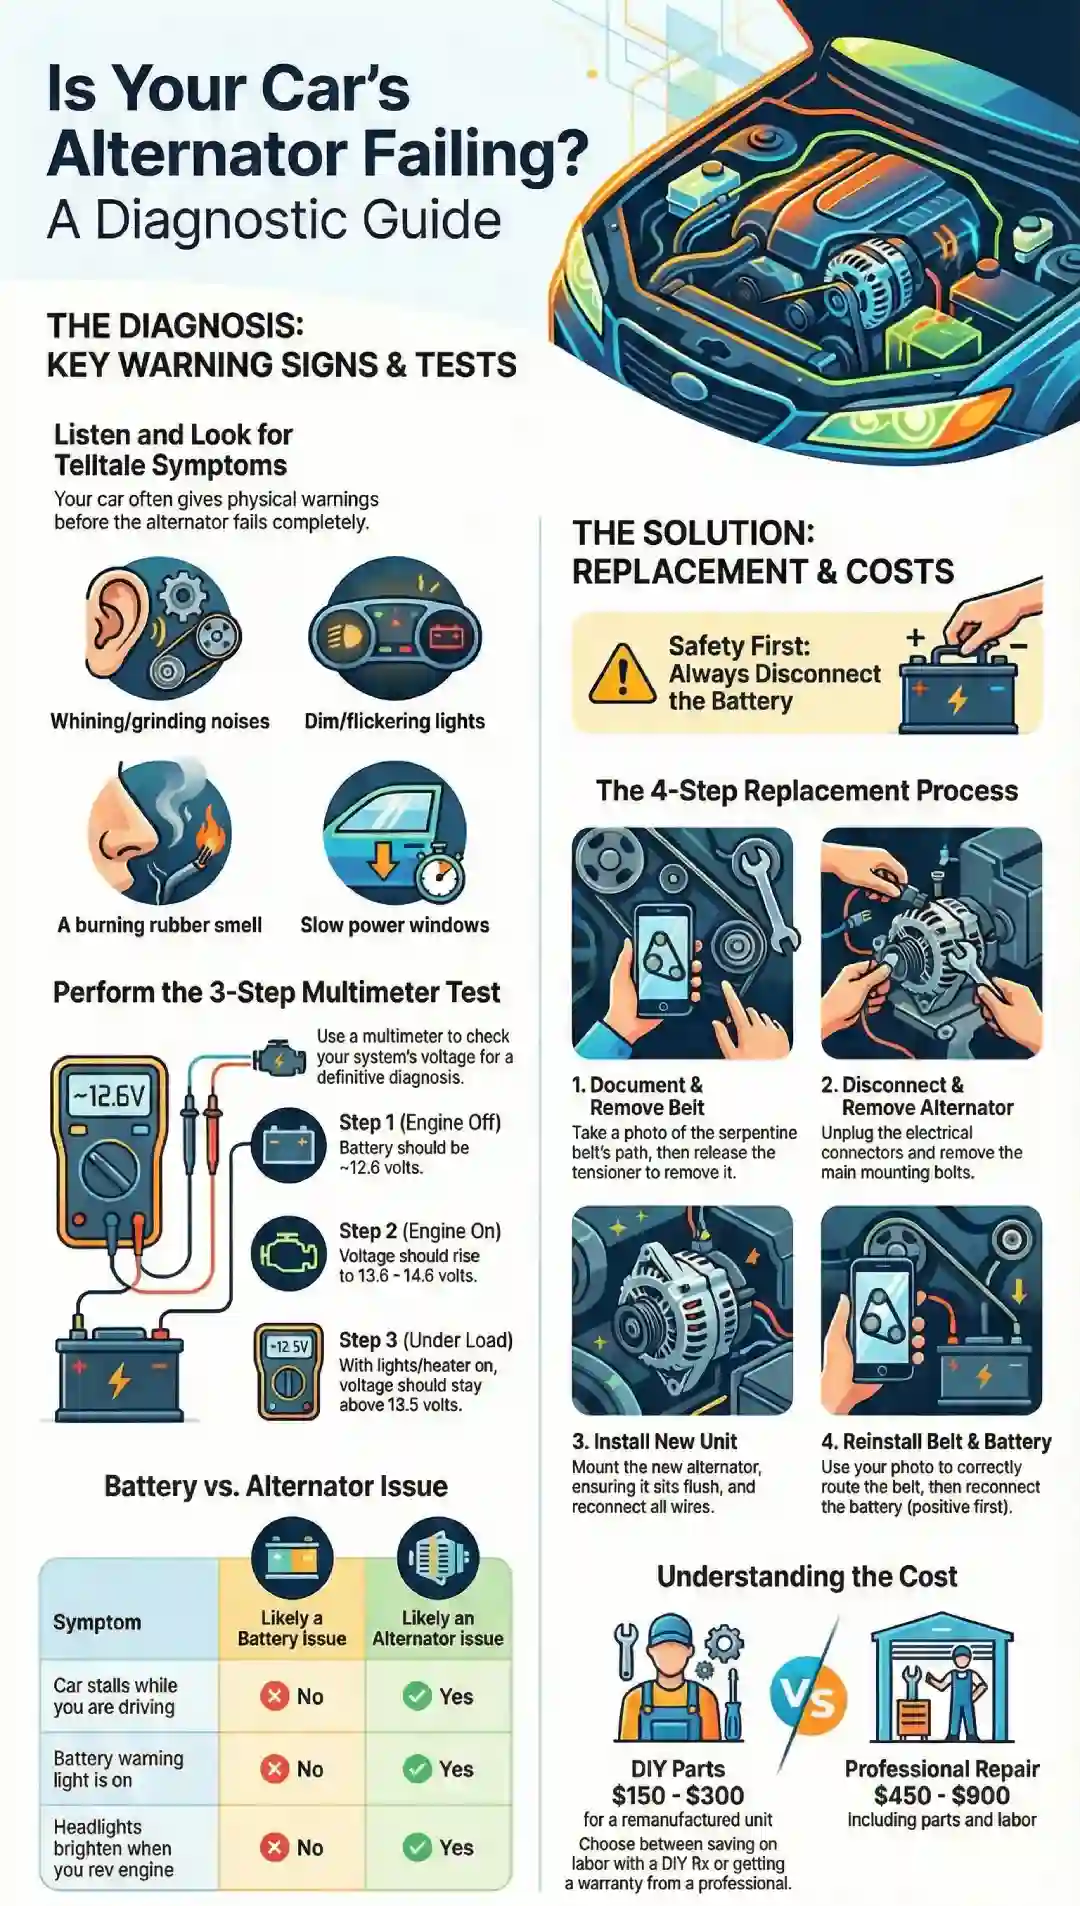
The most accurate way to check your charging system is by using a digital multimeter. First, check the resting voltage of your battery with the engine off; it should show about 12.6 volts. Second, start the engine and check the voltage again. A healthy alternator should push that number up to between 13.8 and 14.5 volts as it pumps energy back into the system.
Finally, perform a load test by turning on your headlights, the heater fan, and the radio. If the voltage drops below 13.5 volts while the engine is running with these loads, your alternator is struggling to keep up. This simple test is a professional standard we use at Torrance Motors to confirm if a car is safe for a long commute on the 405.
Recognizing Common Failure Symptoms
Your car will often give you physical or audible warnings before the electrical system completely fails. If you hear a high-pitched whining or grinding noise coming from the front of the engine, the internal bearings of the alternator are likely dry or damaged. You might also notice your dashboard lights flickering or your power windows moving much slower than usual.
Sometimes, you might even smell something like burning rubber or an electrical “hot” scent. This happens when the serpentine belt is slipping on a stuck pulley or the internal wiring is overheating. Paying attention to these signs early can help you fix the issue before the car leaves you stranded at a busy intersection.
Quick Diagnosis Table
| Symptom | Likely Battery Issue | Likely Alternator Issue |
| Car won’t start after sitting overnight | Yes | Sometimes |
| Car stalls while you are driving | No | Yes |
| Battery light stays on while driving | No | Yes |
| Headlights get brighter when you rev the engine | No | Yes |
| Grinding or whining noise from engine | No | Yes |
Can You Actually Fix an Alternator?
Many people ask if they can repair the internal parts of an alternator rather than replacing the whole unit. In some cases, especially with older Toyotas or BMWs frequently seen in Torrance, you can replace specific parts like the voltage regulator or the carbon brushes. The voltage regulator is the “brain” that tells the alternator how much power to produce, and the brushes are the parts that make physical contact to transfer electricity.
If the internal copper windings are burnt or the diodes have failed, the unit is usually considered “non-serviceable” for a DIYer. While replacing the whole unit is the most common fix, checking for corroded wires or a loose plug can sometimes solve the problem for free. If you aren’t comfortable testing high-amperage wires yourself, bring your car to us for a professional diagnostic and top-tier car maintenance to ensure your vehicle is ready for the road.
Step-by-Step Replacement and Serpentine Belt Management
The Safety Redline: Disconnecting the Battery
Before you touch a single bolt on your alternator, you must disconnect your battery. This is not just a suggestion; it is a critical safety step to prevent a major electrical short circuit. The main wire connected to the back of the alternator is “hot,” meaning it carries a direct current from the battery at all times. If your wrench accidentally touches that wire and a metal part of the car frame simultaneously, it will create a massive spark that can melt tools, damage your car’s sensitive computer, or even cause the battery to explode.
Always loosen the nut on the negative (black) terminal first and tuck the cable away so it cannot spring back and make contact. Only after the negative cable is off should you remove the positive cable. This simple sequence ensures the electrical circuit is completely broken, allowing you to work with peace of mind. Always disconnect the negative terminal first. Following these automotive electrical safety protocols ensures you don’t accidentally short-circuit your car’s sensitive engine control module.
Serpentine Belt Management and Routing
Most modern cars use a single serpentine belt to drive the alternator, water pump, and power steering. Before you remove this belt, you need a plan for putting it back on. These belts snake around several different pulleys in a specific pattern that can be very confusing to remember. We highly recommend taking a clear photo of the belt’s path with your phone or sketching a diagram.
To remove the belt, you will need to locate the automatic belt tensioner, which is a spring-loaded pulley that keeps the belt tight. Using a long-handled wrench or a specialized serpentine belt tool, you will rotate the tensioner to release the pressure, allowing you to slip the belt off the alternator pulley. If your belt has cracks, fraying, or a glazed “shiny” look, now is the perfect time to replace it since you already have it off.
Disconnecting and Removing the Old Unit
With the belt out of the way, you can now focus on the alternator itself. There is usually one large wire held on by a nut and one or two smaller plastic electrical connectors. Be very gentle with the plastic clips, as the heat from the engine can make them brittle and easy to snap. Once the wires are safely disconnected, you will remove the mounting bolts that hold the alternator to the engine block.
Sometimes these bolts can be stubborn due to years of engine heat and vibrations. If they don’t budge, a bit of penetrating oil can help. Once the bolts are out, you might need to use a small pry bar to gently wiggle the alternator out of its bracket. Be careful not to drop it, as alternators are heavy and can damage other engine parts if they fall.
The Bench Test: Verifying the Failure
Before you go out and buy a replacement part, it is a smart move to have your old alternator “bench tested.” Most local auto parts stores in Torrance offer this service for free. They have a machine that spins the alternator at high speeds and measures the output under a simulated load. This final check ensures that the alternator is definitely the problem and that you aren’t dealing with a hidden issue like a blown fuse or a broken wire somewhere else in the car. If the bench test confirms the unit is dead, you can move forward with buying a new or remanufactured unit, knowing your money is being spent on the right fix.
If you are unsure about your car’s charging health. Our team can perform a full alternator and battery diagnostic to ensure you aren’t spending money on parts you don’t need. From BMW valve cover leaks that can ruin an alternator to standard Toyota maintenance, we are here to keep your South Bay commute stress-free.
The Installation Process: Precision and Tension
Once you have your new or remanufactured unit, the installation is mostly the reverse of the removal, but with a few critical technical points. When you slide the new alternator into its bracket, ensure it sits perfectly flush before tightening the mounting bolts. If the alternator is slightly crooked, it will put uneven pressure on the serpentine belt, causing it to wear out or snap within a few hundred miles.
After the bolts are snug, reattach the electrical harness and the main battery cable. When putting the belt back on, use your photo or diagram from earlier to ensure every loop is correct. Modern automatic tensioners usually take the guesswork out of how tight the belt should be, but it is a good idea to push on the longest stretch of the belt; it should have no more than half an inch of “give.” Finally, reconnect the battery, positive first, then negative, to restore the electrical circuit.
Advanced Troubleshooting: The “Ghost” Problems
Sometimes, you can install a brand-new alternator and still find that your battery light stays on. This is what mechanics call a “ghost” problem, and it usually stems from a faulty connection rather than a bad part. One common culprit in Torrance is a blown fusible link, which is a high-amperage fuse located in the main wire between the alternator and the battery.
If this link is fried, the alternator can be spinning and producing power, but that power never actually reaches the battery. Another issue is a poor engine ground. If the metal bracket where the alternator sits is corroded or covered in oil, the alternator won’t be able to “ground” properly, preventing it from charging. Always check your wire terminals for green corrosion or looseness before assuming your new alternator is a “dud.”
Alternator Repair Costs in Torrance
Understanding the financial side of alternator repair helps you make the right choice for your budget. For most economy cars in the South Bay, a remanufactured alternator costs between $150 and $300, while a brand-new OEM unit for a luxury vehicle like a BMW or Lexus can reach $500 to $900. If you are hiring a professional shop, labor typically takes between 1.5 and 3 hours. In Torrance, where shop rates usually range from $120 to $180 per hour, you should expect a total bill between $450 and $900 for standard vehicles. While the DIY route saves on labor, professional shops like Torrance Motors provide a warranty on both the part and the work, which can be a lifesaver if the new unit fails prematurely.
FAQ: Frequently Asked Questions
How long can I drive with a bad alternator?
You should only drive as far as it takes to reach a safe parking spot. Once the alternator stops charging, your car is running entirely on the battery’s reserve power. Depending on your battery’s health and how many electronics you have on (like A/C or lights), you may only have 15 to 30 minutes before the engine stalls completely.
Will a jump-start fix my alternator?
No, a jump-start only provides enough energy to get the engine running. If the alternator is dead, it will not be able to maintain that charge. The car will likely die again as soon as you remove the jumper cables or shortly after you start driving.
Why does my new alternator smell like it is burning?
A slight “hot” smell is normal for the first few minutes of operation as the protective coatings on the new copper windings cure. However, if you smell burning rubber, your serpentine belt is likely too tight, misaligned, or slipping, and you should shut off the engine immediately to check the belt routing.
Why is my battery light on even though my car is driving fine?
This usually means your alternator is “under-charging.” It is producing just enough power to keep the engine running, but not enough to refill the battery or handle extra loads like your headlights. You are essentially on borrowed time before the car fails to start.
Can a bad alternator ruin a brand-new battery?
Yes. If the alternator’s voltage regulator fails, it can “overcharge” the battery with too much voltage, causing the internal acid to boil and destroying the battery’s ability to hold a charge. A faulty alternator can turn a simple repair into a much more expensive double replacement.
Conclusion: Keep Your Electrical System Healthy in Torrance
Your alternator is the silent worker that keeps your car’s brain, lights, and battery alive. Whether you are dealing with a flickering battery light on your way to a game at the high school or a strange whining noise while cruising down Hawthorne Blvd, taking action early is the best way to prevent a tow truck bill. While a DIY fix is possible for those with the right tools, electrical systems in modern cars are sensitive and can be easily damaged by a single mistake.
