
How Do You Replace the Starter Assembly?
There is nothing quite as frustrating as sitting in your car at the Torrance Promenade, turning the key, and hearing absolutely nothing. That sudden silence usually means your starter motor has finally given up. The starter assembly is a small but powerful electric motor that high-jacks your battery’s power to physically crank the engine over until it runs on its own. When this part fails, you are effectively stranded, regardless of how much gas is in the tank or how new your tires are.
This guide will help you figure out if your starter is actually the problem and walk you through the steps to get your vehicle back on the road, ensuring your morning commute on the 110 freeway is never interrupted by a no-start surprise.
Is it the Starter, Battery, or Alternator?
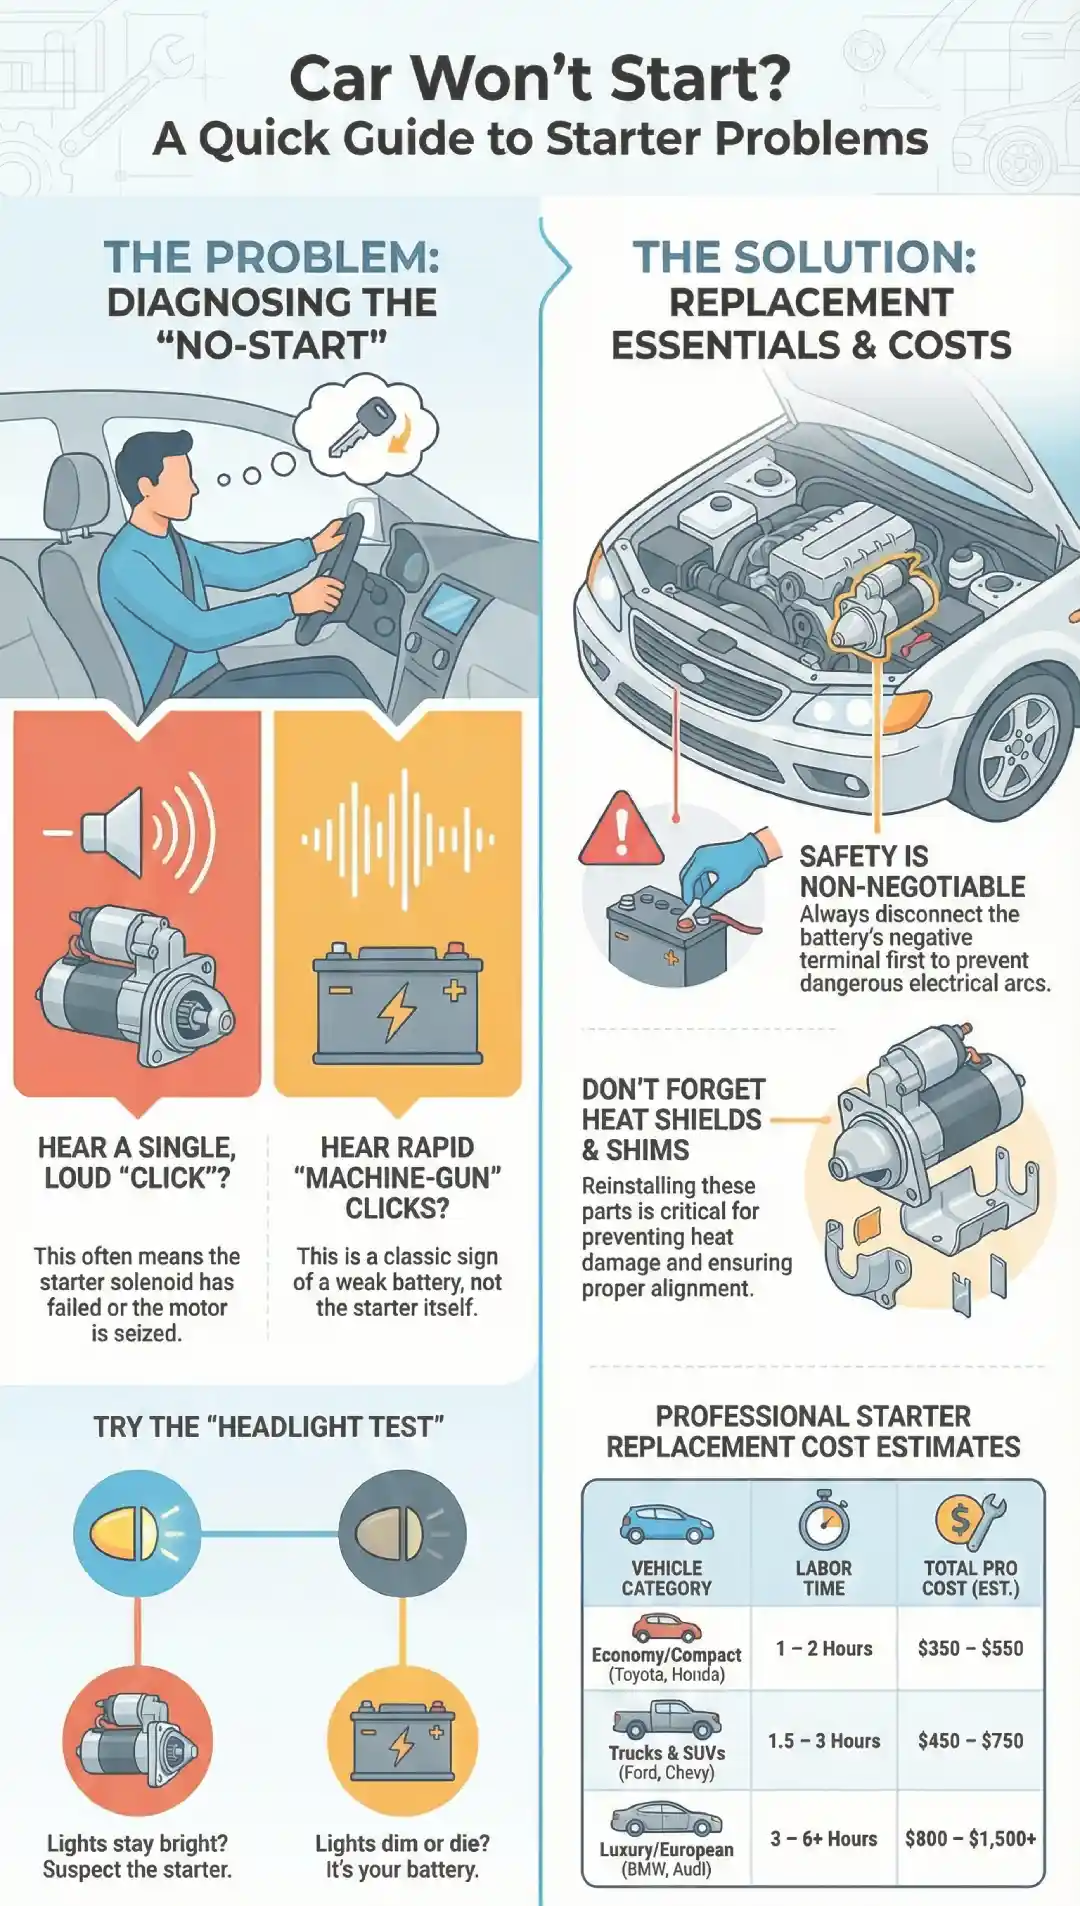
Before you start pulling parts off your engine, you have to be sure the starter is the true culprit. A very common mistake is replacing the starter when the battery is simply too weak to turn it. Listen closely when you try to start the car: a single, loud click often means the starter solenoid is engaging but the motor inside is seized or broken.
On the other hand, a rapid machine-gun clicking sound usually points to a dying battery that doesn’t have enough juice to hold the solenoid closed. You can also try the headlight test by turning your lights on and then trying to start the engine. If the lights stay bright but the car doesn’t crank, the starter is likely dead. If the lights go completely dark, your battery is the primary suspect.
The Tap Trick: A Temporary Warning
If you are stuck and need to get your car home to Torrance, you can sometimes use a temporary fix known as the tap trick. By gently tapping the body of the starter motor with a wrench or a heavy stick while someone else turns the ignition, you can sometimes jar the internal electrical contacts back into place. This works because the vibration helps the carbon brushes inside the motor make one last connection with the armature.
While this might get the engine to fire up once or twice, it is a clear sign that the starter has dead spots and is on the verge of total failure. Never rely on this for more than a single trip; once a starter needs a hit to start, it needs to be replaced immediately.
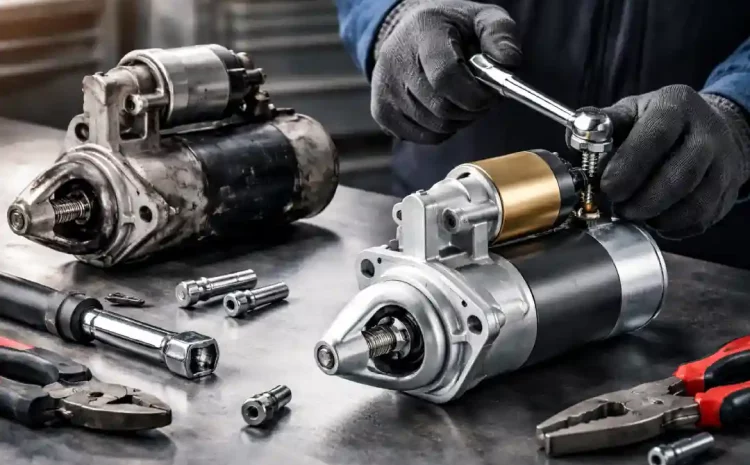
Essential Tools and Safety Checklist
Replacing a starter requires a few specific tools and a focus on electrical safety. You will generally need a socket set with various extensions, as starters are often tucked away in hard-to-reach spots near the back of the engine. Because the starter is connected directly to your battery with high-amperage cables, you must disconnect the Negative (Black) Terminal before you do anything else.
If your tool touches a live wire and the car frame at the same time, you can cause a massive electrical arc that can burn your hands or fry your car’s expensive computer system. Additionally, because you will likely be working underneath the vehicle, always use high-quality jack stands. Never trust a single hydraulic jack to hold the car up while you are reaching near the heavy engine block.
Diagnostic Checklist for Starter Failure
| Symptom | Potential Cause | Immediate Action |
| Single loud Click | Failed Starter Solenoid | Check connections / Replace Starter |
| Rapid Click-Click-Click | Low Battery Voltage | Jump-start or Charge Battery |
| Grinding Noise | Damaged Starter Gear | Replace Starter & Check Flywheel |
| Whirring Sound (No Crank) | Solenoid not engaging gear | Replace Starter Assembly |
| Smoke or Burning Smell | Electrical Short | Disconnect Battery Immediately |
Locating the Starter in Modern Vehicles
Finding where the starter assembly lives can be the hardest part of the job. In many older vehicles and trucks, it is easily accessible on the side of the transmission bell housing. However, many modern cars, especially brands like Honda or BMW frequently, hide the starter underneath the intake manifold or behind heat shields. This means you might have to remove several other parts just to see the starter. Before you begin, it is a good idea to look up your specific year and model to see if you need to buy extra gaskets for the intake or if you can reach it from underneath the car after removing the plastic splash guards.
The Step-by-Step Starter Assembly Replacement
Step 1: Accessing the Starter and Clearing the Path
Once your car is safely secured on jack stands, the first hurdle is physically reaching the starter. As we discussed, this location varies wildly; for many trucks and rear-wheel-drive vehicles common in the South Bay, you can reach it easily from underneath. However, if you are driving a front-wheel-drive car or a European model, you might need to remove the plastic splash shields or even the intake manifold to get a clear view.
If your starter is buried, take photos of every vacuum line and electrical plug you disconnect so you can put them back exactly as they were. Clearing a path properly is the difference between a one-hour job and a frustrating afternoon of lost bolts and broken plastic clips.
Step 2: Disconnecting the Electrical Solenoid Wiring
Every starter assembly has two main electrical connections that you must handle with care. The first is a thick battery cable (the B-terminal) held on by a nut, and the second is a smaller wire (the S-terminal) that receives the signal from your ignition switch. These wires are often brittle due to years of engine heat, so use a backup wrench if necessary to keep the terminal from spinning while you loosen the nut.
It is a good idea to wipe these connectors clean with a wire brush or some sandpaper before you move on. Clean metal-to-metal contact ensures that your new starter gets the full amperage it needs to crank the engine, which is especially important during those damp mornings near the coast.
Step 3: Removing Mounting Bolts and the Old Unit
The starter is typically held to the transmission bell housing by two or three long bolts. These bolts are under a lot of stress and can be very tight, so a long-handled ratchet or a cheater pipe might be necessary to break them loose. As you remove the final bolt, be prepared to support the weight of the starter with your other hand; these units are surprisingly heavy and can easily crack a plastic sensor if they fall.
Once the bolts are out, you may need to give the starter a gentle wiggle or use a pry bar to break it free from the housing. Take this moment to look at the teeth on the end of the starter gear, if they are badly chewed up, you should also inspect the teeth on your engine’s flywheel for similar damage.
Step 4: The Critical Use of Shims and Heat Shields
This is the part many DIY guides miss: the importance of proper alignment and heat protection. Some vehicles, particularly older GM models, require small metal spacers called shims to align the starter gear perfectly with the flywheel. If you find shims behind your old starter, keep them and reinstall them in the same spot. Without them, your new starter might grind or fail to engage at all.
Additionally, always reinstall the original heat shield. The starter lives very close to the exhaust manifold, which can reach over 1,000 degrees. Without that shield, the internal copper wiring in your new starter will heat soak and fail prematurely, a common issue in heavy South Bay traffic where engine bay temperatures skyrocket.
At Torrance Motors, we don’t just part-swap; we look for the root cause of the failure. If your car is making a strange grinding noise or just won’t start, bring it to our full maintenance checklist.
Testing the New Starter: The First Start
Once the new starter assembly is bolted in and the wiring is secure, the moment of truth arrives. Reconnect your battery terminals and turn the ignition key to the start position. A healthy starter should engage immediately with a crisp, powerful whirring sound followed by the engine firing up. It is important to listen for any abnormal noises; a high-pitched screech or a heavy clunk can mean the starter gear isn’t aligning properly with the flywheel.
If you experience a no-start immediately after installation, don’t panic. Re-check your battery connections and the small signal wire (S-terminal), as even a slightly loose plug will prevent the solenoid from triggering the motor.
Post-Installation Troubleshooting: Ghost No-Starts
Sometimes, even with a brand-new starter, your car might still refuse to turn over. This is often caused by a faulty starter relay or a blown fuse rather than the motor itself. The relay is the electrical switch that sends the high-amperage signal to the starter; if the internal contacts of the relay are burnt, the power will never reach its destination. Another common issue for Torrance drivers, especially those with BMWs or Toyotas, is a modern recall-related fault.
In late 2025, a major recall was issued for nearly 200,000 vehicles (including the BMW 3-Series and Toyota Supra) due to starter motor relays that can corrode and overheat. If your new starter feels sluggish or smells hot, you may be dealing with a wider electrical system fault or a corroded ground strap that needs cleaning.
Average Starter Replacement Costs in Torrance
Understanding the local market price helps you decide whether to DIY or head to a shop. For a standard vehicle like a Toyota Camry or Honda Accord, you can expect to pay between $350 and $600 for a professional replacement in the South Bay. However, for luxury or performance vehicles, such as the BMW 5-Series or X5, the cost can jump to $800 or even $1,500.
This increase is largely due to labor; in some engines, the starter is buried deep under the intake manifold, requiring hours of disassembly. At Torrance Motors, we provide transparent quotes that break down the price of the OEM-quality part and the exact labor hours required for your specific model.
Starter Replacement Cost & Time Estimates
| Vehicle Category | Estimated Part Cost | Labor Time | Total Pro Cost (Est.) |
| Economy/Compact (Toyota, Honda) | $150 – $300 | 1 – 2 Hours | $350 – $550 |
| Trucks & SUVs (Ford F-150, Chevy) | $200 – $400 | 1.5 – 3 Hours | $450 – $750 |
| Luxury/European (BMW, Audi, Lexus) | $350 – $700+ | 3 – 6+ Hours | $800 – $1,500+ |
If you are tired of the click-click uncertainty every time you leave for work. Our expert technicians specialize in comprehensive electrical diagnostics and precision starter motor installation. We serve the entire Torrance area with honest, high-quality repairs that get you back on the road fast.
FAQ: Critical Starter Questions
How long should a car starter typically last?
Most high-quality starter assemblies are built to last between 100,000 and 150,000 miles. However, frequent short trips or living in a coastal area can shorten this lifespan due to the increased number of starts and potential salt-air corrosion on the electrical terminals.
Can a bad starter drain my battery?
Yes. If the starter motor has an internal electrical short, it can draw a small amount of current even when the car is off, slowly killing your battery overnight. If you find your battery is constantly dead despite being new, the starter might be leaking power.
Is it better to buy a new or remanufactured starter?
A new OEM (Original Equipment Manufacturer) starter is the most reliable option, but a high-quality remanufactured unit from a brand like Denso or Bosch is often just as good for a lower price. Avoid no-name budget starters, as their internal copper windings are often thinner and fail much sooner under heat.
Does my car need shims for the new starter?
Most modern vehicles do not use shims, but some older domestic trucks and cars require them for proper gear alignment. If you saw thin metal plates behind your old starter, you must put them back in the same spot to avoid damaging your engine’s flywheel.
Conclusion: Ensuring a Reliable Start in the South Bay
Your starter assembly is the gatekeeper of your car’s mobility. While replacing it can be a rewarding DIY project, the technical demands of modern electrical systems, especially with the recent 2025 recalls affecting local favorites like the Toyota Supra and BMW 330i, mean that professional help is often the safest route. Ensuring that every bolt is torqued and every heat shield is replaced is what keeps your vehicle reliable for years to come.
Is your car struggling to crank? Call us today at (310) 329-9727 to schedule a professional starter and battery test.
